REF: MEN-2026-0112
Surgery
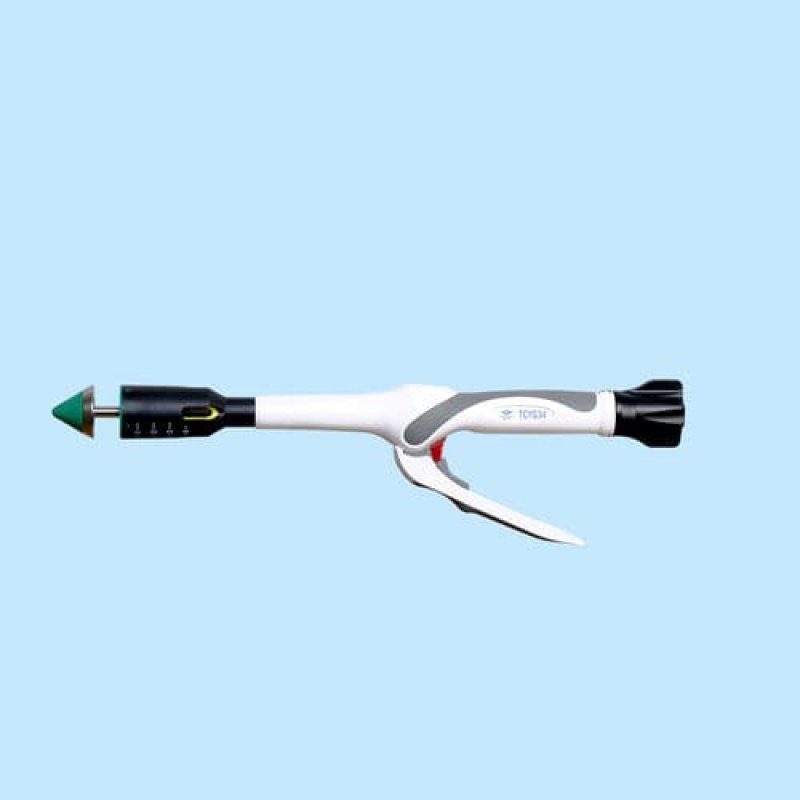
Hemorrhoid/PPH stapler
Sold & Shipped By
Official Store
₦118,000.00
Product Code MEN-2026-0112
Condition New
Availability In Stock
Warranty
Sub-Category Hemorrhoid
Increased Cartridge Volume: Designed with a larger cavity to accommodate more prolapsed tissue, which is critical for effective resection.
Three-Row Staple Technology: Features three rows of staples for better hemostasis, reducing bleeding after firing.
"B" Shape Staple Formation: Produces B-type staples with slightly incurved feet, providing high tensile strength and secure tissue closure.
Enhanced Visibility & Control: Includes a large indication window for precise firing control. Some models feature a transparent cartridge to allow surgeons better visibility of the captured tissue.
Extra-Thin Anvil: Designed to facilitate easy insertion and placement during the purse-string suture process.
Fool-firing" Position: Prevents accidental or improper firing
Secure Anatomy Protection: The design helps avoid tissue pulling and protects the anastomosis site.
Long Anvil Shaft: Provides adequate length for easier handling.
Tactile and Sound Feedback: Provides clear feedback after firing to ensure the surgeon knows the procedure is complete.
Three-Row Staple Technology: Features three rows of staples for better hemostasis, reducing bleeding after firing.
"B" Shape Staple Formation: Produces B-type staples with slightly incurved feet, providing high tensile strength and secure tissue closure.
Enhanced Visibility & Control: Includes a large indication window for precise firing control. Some models feature a transparent cartridge to allow surgeons better visibility of the captured tissue.
Extra-Thin Anvil: Designed to facilitate easy insertion and placement during the purse-string suture process.
Fool-firing" Position: Prevents accidental or improper firing
Secure Anatomy Protection: The design helps avoid tissue pulling and protects the anastomosis site.
Long Anvil Shaft: Provides adequate length for easier handling.
Tactile and Sound Feedback: Provides clear feedback after firing to ensure the surgeon knows the procedure is complete.
Increased Cartridge Volume: Designed with a higher capacity to accommodate more tissue during the resection.
Large Indication Window: Features a wide indicator for precise control during the firing sequence.
Long Anvil Shaft: Provides an extended length, facilitating easier placement of the purse-string suture.
Firing Feedback: Provides both sound and tactile feedback to ensure the surgeon confirms the completion of the firing process.
Thin Anvil/High-Rigidity Shaft: The device uses an extra-thin anvil for easy insertion, combined with a high-rigidity shaft for better stability during the procedure.
Adjustable Staple Formation: The stapler is designed for different thicknesses of tissue.
Safety Features: Often includes a stainless steel "glans cap" for improved safety and a safety design that prevents firing an empty cartridge
Large Indication Window: Features a wide indicator for precise control during the firing sequence.
Long Anvil Shaft: Provides an extended length, facilitating easier placement of the purse-string suture.
Firing Feedback: Provides both sound and tactile feedback to ensure the surgeon confirms the completion of the firing process.
Thin Anvil/High-Rigidity Shaft: The device uses an extra-thin anvil for easy insertion, combined with a high-rigidity shaft for better stability during the procedure.
Adjustable Staple Formation: The stapler is designed for different thicknesses of tissue.
Safety Features: Often includes a stainless steel "glans cap" for improved safety and a safety design that prevents firing an empty cartridge
Preparation and Insertion:
Remove the device from packaging and remove the anvil cap.
Rotate the adjustment knob counterclockwise to fully extend the trochar and detach the anvil.
Insert the anvil into the rectal lumen, securing it with a, tight, purse-string suture (2–3 mm from the cutting edge) to prevent leakage.
Positioning and Coupling:
Insert the main body of the stapler into the anal canal, positioning it at the previously prepared rectal area.
Extend the trochar through the tissue and attach the anvil by snapping it onto the trochar.
Compression and Firing:
Rotate the adjusting knob clockwise to pull the anvil back and compress the tissue. Monitor the indicator window; the needle should be within the green zone.
Remove the safety mechanism and squeeze the firing handle firmly to cut and staple the tissue simultaneously.
Removal and Inspection:
Turn the knob counterclockwise 2–3 full revolutions to open the instrument.
Gently remove the device, rotating it slightly if necessary.
Inspect the "donut" of tissue (the resected ring) to ensure it is complete and check for hemostasis (bleeding control) at the staple line.
Remove the device from packaging and remove the anvil cap.
Rotate the adjustment knob counterclockwise to fully extend the trochar and detach the anvil.
Insert the anvil into the rectal lumen, securing it with a, tight, purse-string suture (2–3 mm from the cutting edge) to prevent leakage.
Positioning and Coupling:
Insert the main body of the stapler into the anal canal, positioning it at the previously prepared rectal area.
Extend the trochar through the tissue and attach the anvil by snapping it onto the trochar.
Compression and Firing:
Rotate the adjusting knob clockwise to pull the anvil back and compress the tissue. Monitor the indicator window; the needle should be within the green zone.
Remove the safety mechanism and squeeze the firing handle firmly to cut and staple the tissue simultaneously.
Removal and Inspection:
Turn the knob counterclockwise 2–3 full revolutions to open the instrument.
Gently remove the device, rotating it slightly if necessary.
Inspect the "donut" of tissue (the resected ring) to ensure it is complete and check for hemostasis (bleeding control) at the staple line.